
Pictures and graphics
Shapes
Add rectangles, circles, stars, arrows and speech bubbles, and colour them with a fill, an outline or a gradient.
Shapes make price tags, badges, a band of colour behind a heading, or a line between the sections of a menu. A shape's colours are set in two places in the properties panel: its fill on the Item tab, and its outline (Liwan Studio calls it the stroke) and gradient on the Shape tab.
How to add and colour a shape
Tap the shape button on the tool rail, the narrow column of buttons along the left edge of the editor. When Liwan Studio is in Arabic, the rail is on the right edge. The shape button sits under Paragraph Text, shows a rectangle at first, and has a small arrow in its corner.
A rectangle appears in the middle of the part of the page you are looking at, already selected. It has a light sand-coloured fill and no outline. Drag it where you want it, and drag its handles to change its size.
For a different shape, press and hold the shape button and choose one from the list: Rectangle, Rounded Rectangle, Ellipse, Triangle, Polygon, Pentagon, Hexagon, Star, Line, Arrow, Heart or Speech Bubble. The shape is added straight away. From then on the button shows that shape, so the next tap adds the same one again.
Ellipse starts as a circle; drag its handles to stretch it into an oval. Draw (Freehand), at the end of the list, lets you draw by hand instead — see Draw (Freehand).
To work on a shape later, tap it on the page to select it. Its settings appear in the properties panel on the other side of the page. The first time, the panel opens on the Item tab; after that, it opens on the tab you last used for a shape.
To set the fill, look under Appearance on the Item tab, below Opacity, Blend Mode and Frame, and tap the colour swatch next to Fill. Choose a colour. The colour picker also has an opacity slider, for a fill you can see through.
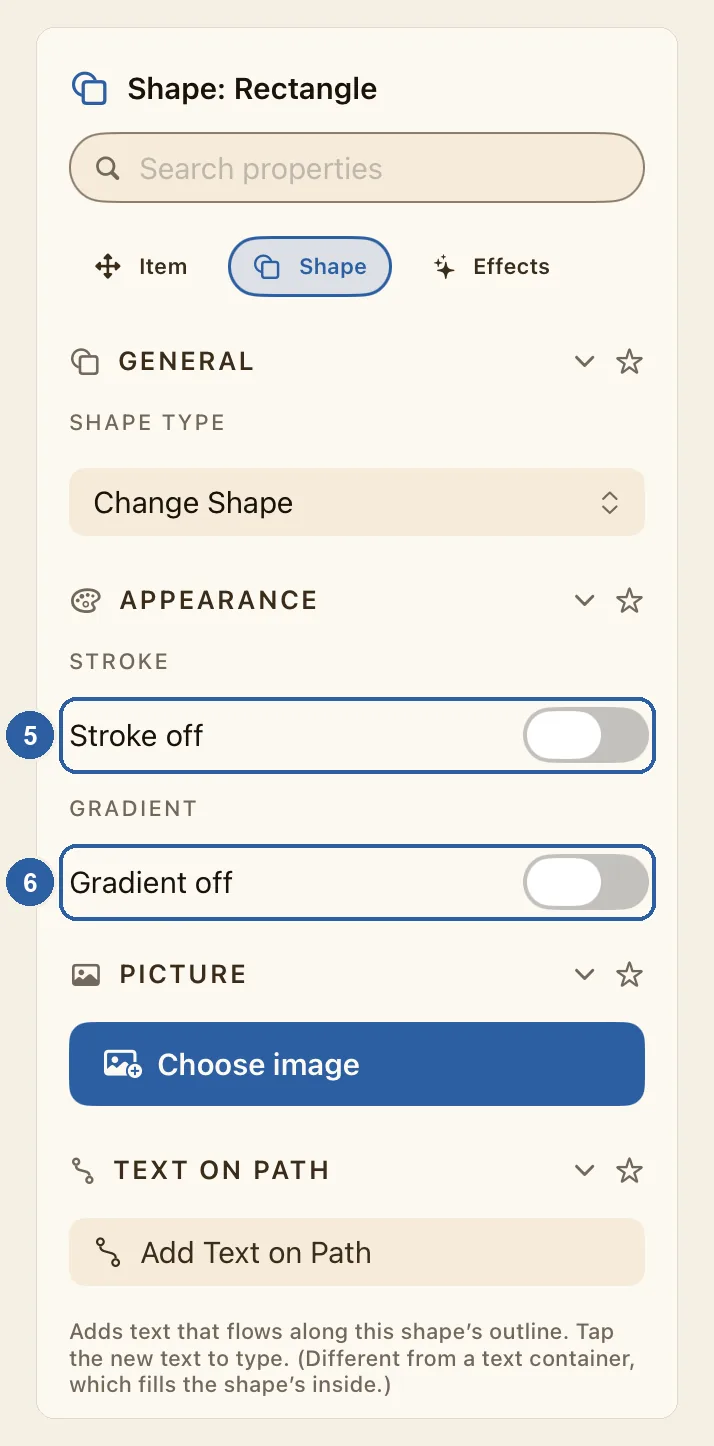
Tap Shape at the top of the panel, between Item and Effects. With a keyboard, you can press S instead. The panel now shows the shape's own settings, as in the picture at the top of this page.
To give the shape an outline, find Stroke under Appearance, marked 5 in the picture, and turn on its switch. The label changes from Stroke off to Stroke on, and a dark outline 2 pt wide appears around the shape.
Tap the swatch next to Color to choose the outline's colour, and drag the Width slider to make it thinner or thicker, from 0.5 to 40 pt.
For a fill that blends from one colour into another, turn on the switch under Gradient, marked 6. It changes to Gradient on, and the shape now blends from its fill colour at the top to a light sand colour at the bottom.
Tap the two swatches next to Colors to choose the first and the second colour. Drag the Angle slider, from 0 to 360°, to turn the direction of the blend. At 90°, where it starts, the first colour is at the top; at 0° it is on the left.
While the gradient is on, the Fill swatch disappears from the Item tab. Turn the gradient off to get your solid fill back, just as you left it.
Tips
- To round the corners of a Rectangle or a Rounded Rectangle, open the Item tab and type a number under Geometry ▸ Corner Radius. TL, TR, BL and BR are the top-left, top-right, bottom-left and bottom-right corners, so you can round only the top two for a tab or a ribbon. Other shapes don't have this section.
- To turn a shape into another one, open the Shape tab and tap Change Shape under Shape Type. The shape keeps its colours, its size and any text inside it.
- A star starts with five points. Change that with Star Points under General on the Shape tab, from 3 to 12.
- A Line has no fill. Colour it with Stroke: it starts as a dark line 2 pt wide.
- For an outline with nothing inside it, turn on Stroke, then open the Fill colour picker and drag its opacity slider all the way down.
- To make the whole shape see-through, outline and all, drag the Opacity slider on the Item tab.
- To write inside a shape, such as a price in a circle or a star, open the Shape tab and turn on Use as text container under Content. Then tap the shape on the page and type: the text wraps inside the shape's outline. Lines don't have this option.
- Like the look you made? On the Shape tab, under Presets, tap Save style as preset…, choose Save Current Style…, type a name and tap Save. To use it, select another shape, open the same menu, which now reads Presets (1), and pick your preset under Apply. Delete Preset, in the same menu, removes one.
- A preset copies the fill, outline, gradient and rounded corners, never the size, position or text. Presets are kept in Liwan Studio rather than in one design, so you can use them in your other designs too.
- The Item tab also has Frame, a border with its own colour, width and style — see Add a border. For a soft shadow under the shape, open the Effects tab — see Drop Shadow.
- To fill a shape with a photo, open the Shape tab and, under Picture, tap Choose image. The photo fills the shape's outline; double-tap the shape to open the photo on the Customize Image page. Under Text on Path, Add Text on Path sets text along the shape's outline — see Text on Path.