
Canvas and layout
Resize and rotate objects
Make a photo, shape or text box bigger, smaller or tilted by dragging its handles, or type the exact size you need.
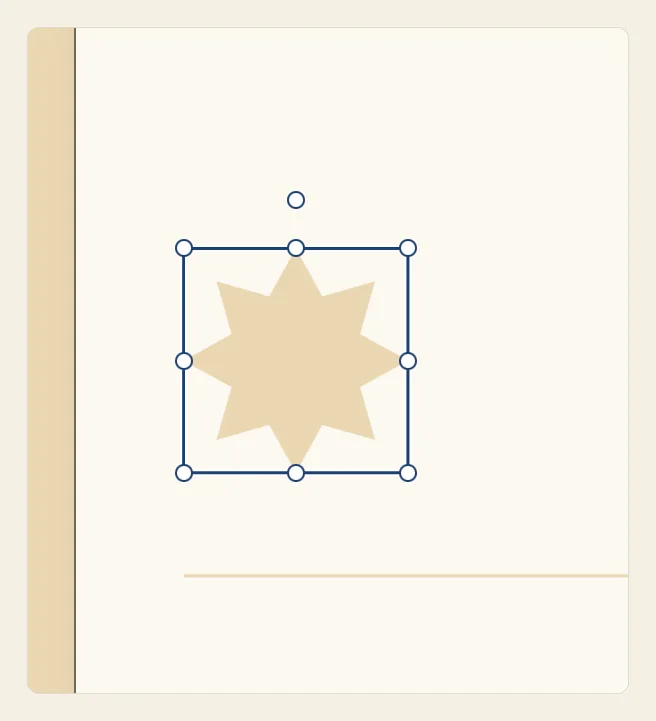
How to resize and rotate an object
Tap the photo, shape or text box you want to change. A blue outline appears around it with eight small round handles: one at each corner and one in the middle of each side. A ninth handle sits on its own just above the outline.
If other objects cover it, tap Layers, the stacked-layers button at the bottom of the tool rail, tap the object's row, then tap Done. Tapping a text box also puts the cursor in it, ready to type. To stop typing and keep the box selected, tap Item (Box), the four-arrows button at the top of the tool rail.
Drag a corner handle to make the object bigger or smaller, as in the picture at the top of this page. The opposite corner stays where it is. A handle in the middle of a side changes only the width or only the height.
A corner handle changes the width and the height freely, so the object can end up wider or taller than it was. To keep its proportions, hold ⇧ (Shift) while you drag, on a Mac or on iPad with a keyboard. On iPad you can also rest a second finger on the page while the first one drags.
To rotate the object, press the round handle above the outline and drag it around the object, like the hand of a clock. The object turns around its centre, and a small label above it shows the angle, for example 30°.
The object clicks into place at every 15° — 0°, 15°, 30°, 45°, 90° and so on — so an exact tilt is easy to hit. To stand the object straight again, turn it back until the label reads 0°.
Once the object is tilted, its blue outline stays upright and grows to wrap around it.
For exact numbers, use the Item tab of the panel beside the page. Selecting a picture or a shape usually opens it; selecting text opens the Text tab instead. To switch, tap Item at the top of the panel. With a keyboard, you can also press V when you are not typing.
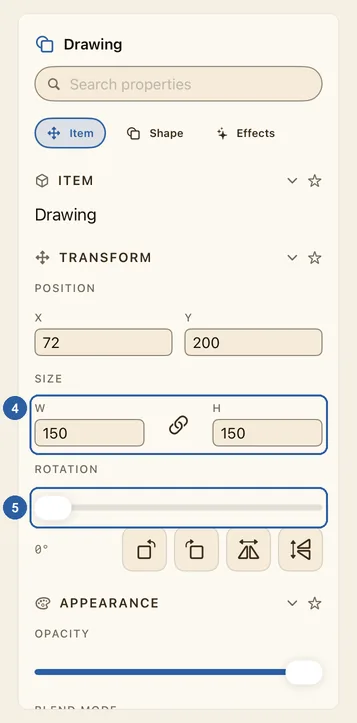
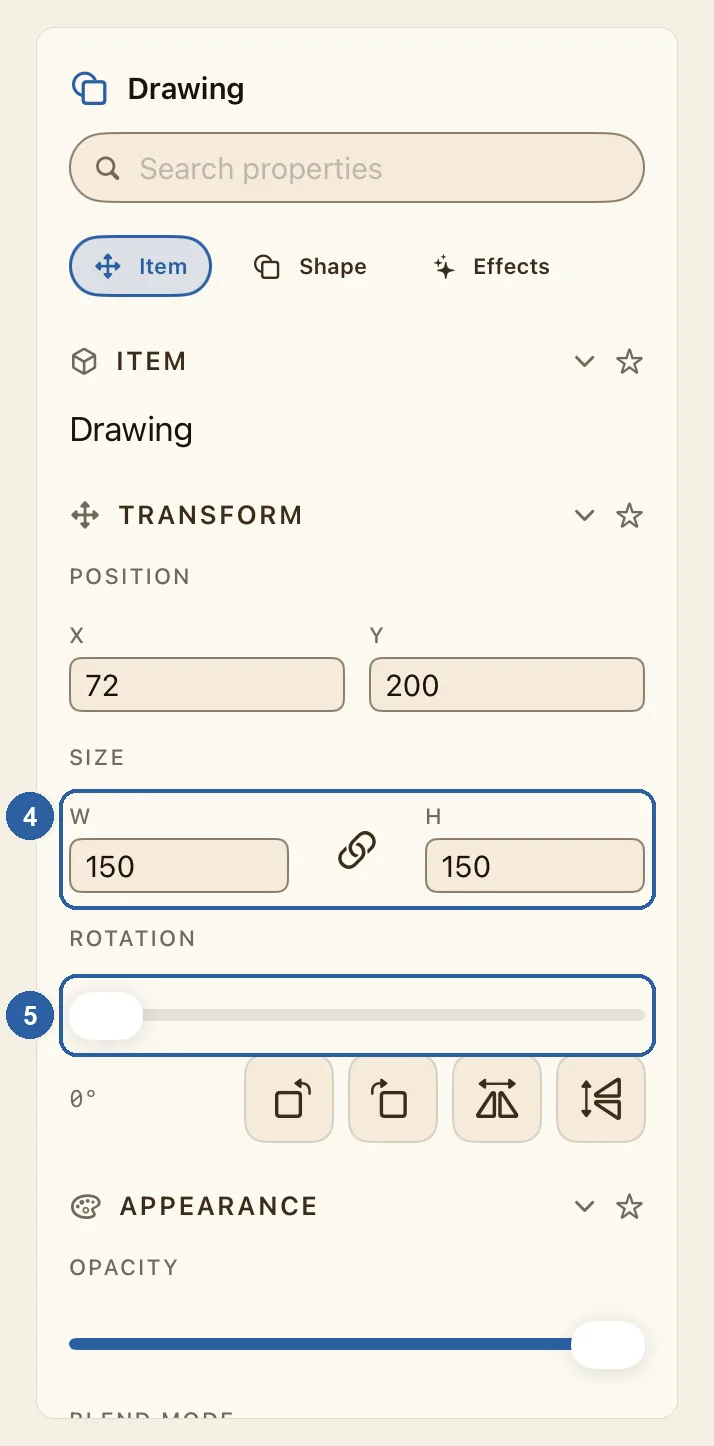
Under Transform, in Size, marked 4, type the width in W and the height in H, then press Return or tap outside the field. They use the same units as the page size: on a 1080 × 1080 Instagram post, a W of 540 is half the width of the page.
To rotate, drag the Rotation slider, marked 5. The angle shows under it, from 0° to 360°. Drag it all the way back to the start for 0°. The two arrow buttons beside the angle turn the object a quarter turn to the left or to the right, and the two after them, Flip Layer Horizontally and Flip Layer Vertically, mirror it.
Tips
- W and H change one at a time, so a new width on its own changes the object's shape. For a picture, a sticker or a shape, tap the chain-link button between them (Lock Aspect Ratio) to keep the proportions: while it is on, a new W changes H to match, and the other way round. Otherwise, multiply or divide both by the same number: half of 600 × 400 is 300 × 200.
- Nothing can be smaller than 16 × 16. A smaller number in W or H becomes 16.
- Position, just above Size, places the object at exact X and Y values. See Select and move objects.
- Resizing a text box never changes the size of its letters; use the text style bar for that. In a paragraph box, the text re-flows to the new width. The handles of an Artistic Text box can't make it smaller than the words inside it.
- Changing the height of a paragraph box, with a handle or by typing a new H, turns off Auto height (in the Text tab, under Text Box), so the box keeps the height you gave it. If it is too short, the lines that don't fit are hidden — see Troubleshooting.
- When a picture's box changes shape, Image Fit in the Image tab decides whether the photo fits inside it, fills it and is cropped, or stretches to it. See Add and adjust pictures. The bigger a photo is on the page, the fewer of its pixels fall on each inch of paper; Preflight warns you when there are too few for print.
- Resizing a table widens or narrows all its columns together. While Auto Row Height is on in the Table tab, each row stays as tall as its text needs, so the top and bottom handles don't change the table's height. See Tables.
- On a small object the handles sit close together, and a corner handle takes priority over the others. Zoom in to reach the one you want — see Zoom.
- The handles work only when a single object is selected. With several objects selected, set the size and rotation of each one separately. See Work with several objects at once.
- In a narrow window on iPad, tap Item (Box) to open the panel from the bottom of the screen.
- Each drag of a handle, each number you type and each move of the slider is one step you can undo. See Undo and redo.