
Pictures and graphics
Add and adjust pictures
Place your own product photos and logos, choose how each one fills its box, crop it and round its corners.
Every picture sits in a box on the page. The Image panel decides how the photo fills that box, which part of it shows and how round the corners are. Cropping means hiding the parts of a photo you don't want, so that the dish or the product fills the frame.
How to add and adjust a picture
Tap Image, the photo button on the tool rail. On iPad, the Photos window opens: tap Add from device at the top and choose a photo from your photo library. On a Mac, the button opens the Media window instead — see "On a Mac" at the end of this page.
The window closes and the photo appears in the middle of the part of the page you can see, in a box the same shape as the photo.
Tap the picture on the page to select it. Handles appear around it. A photo you have just added is already selected. If other objects cover it, pick it in Layers.
In the properties panel beside the page, tap Image, the tab with the photo icon at the top of the panel. A selected picture often shows the Item tab first. You can also double-tap the picture, or press I on a keyboard.
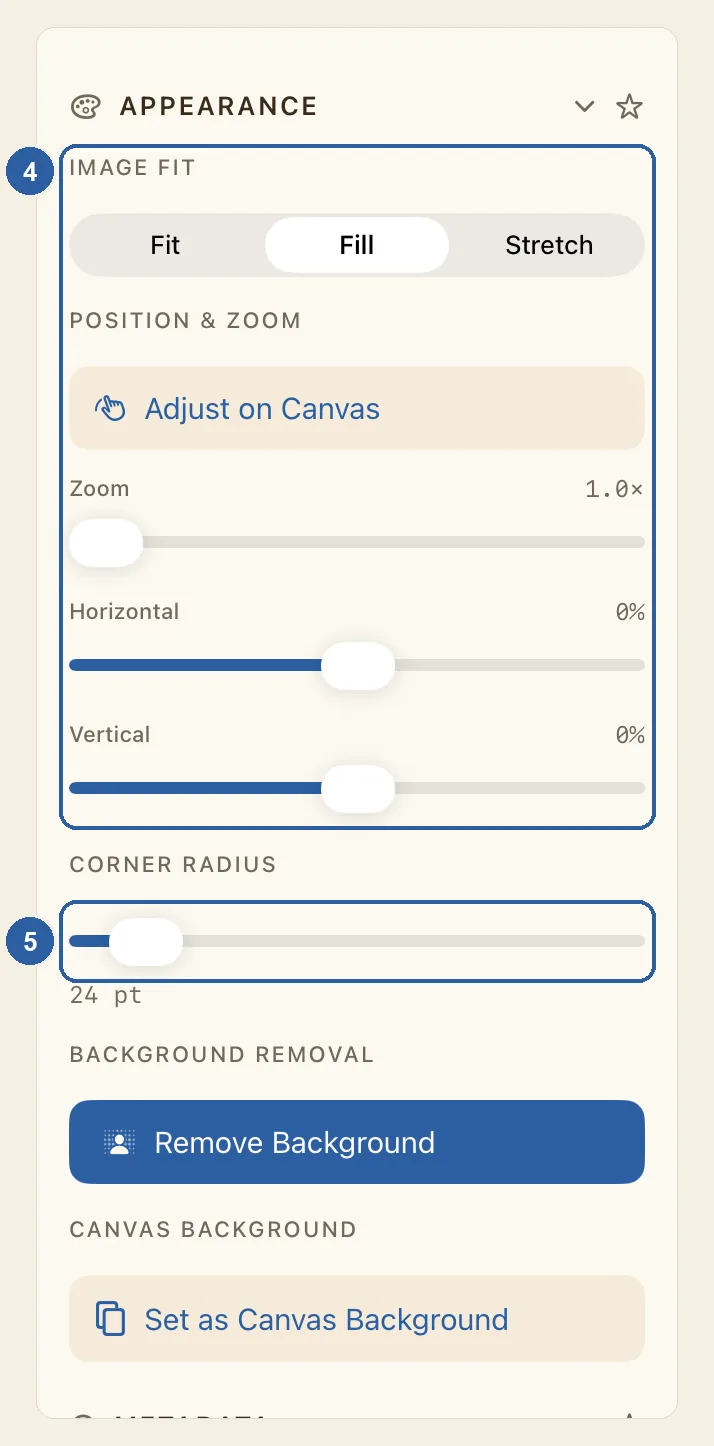
Scroll down to Appearance if you need to. The controls marked 4 in the picture at the top of this page set how the photo fills its box, and the slider marked 5 rounds its corners.
Under Image Fit, choose how the photo fills the box:
- Fit shows the whole photo. If the box is a different shape, empty space is left at the sides or at the top and bottom.
- Fill covers the whole box and cuts off whatever sticks out.
- Stretch pulls the photo to the shape of the box, which can squash or widen it.
Then, under Position & Zoom, drag Zoom to enlarge the photo inside its box, from 1.0× up to 4.0×, and drag Horizontal and Vertical to choose which part shows.
Or tap Adjust on Canvas and drag the photo itself inside its box. A bar at the top of the editor reads "Drag the image to reposition it in the box"; tap Done in it when you finish. Once you have zoomed or moved the photo, Reset position appears under the sliders and puts it back as it was.
Under Corner Radius, drag the slider marked 5 to the right to round the corners of the box. The amount shows under the slider, in points. At the far end, a square picture becomes a circle, and a long one gets fully rounded ends.
Tips
- A new photo starts on Fit, in a box the same shape as the photo, so Fit and Fill look the same at first. The difference shows once the box changes shape: drag one of its handles, or type a new W or H under Size in the Item tab.
- For a round profile photo, make the box square by typing the same number in W and H, choose Fill, then drag Corner Radius all the way to the right.
- While the Image tab is showing, dragging the photo on the page slides it inside its box instead of moving the box. It only slides when part of the photo is hidden, so choose Fill or zoom in first. To move the box itself, tap Item at the top of the panel, or press V.
- To put a different photo in the same place, tap Replace Image under Content, at the top of the Image panel. The box stays centred where it was and takes the shape of the new photo; its fit and corner radius stay as they were. Clear Image, just below, empties the box but leaves it on the page. Double-tap an empty box to choose a photo for it.
- On iPad, press and hold the picture and lift your finger; on a Mac, right-click it. The menu that appears has Replace Image, and Crop, which works like Adjust on Canvas.
- You can also drag a photo from another app and drop it on the page: from Files or Photos open beside Liwan Studio on iPad, or from Finder on a Mac. Dropped on a picture that is already there, it replaces that picture's photo — handy for the photo boxes in a template.
- Liwan Studio opens PNG, JPEG, HEIC, WebP and SVG images. A logo saved as SVG stays sharp at any size. The photo library on iPad does not offer SVG files, so drag the file in from the Files app.
- To fade a photo, drag Opacity in the Item tab. For a border around it, see Add a border; for a shadow, see Drop Shadow.
- Further down the Image panel, Remove Background cuts the subject out of its background — see Remove Background. Set as Canvas Background makes the photo the background of the page and removes its box — see Canvas size.
- In a narrow window on iPad, the properties panel is hidden. Tap Item (Box) at the top of the tool rail to open it from the bottom of the screen, then tap Image. Adjust on Canvas closes the panel again so you can reach the photo.
- You can undo each of these changes. See Undo and redo.