
Pictures and graphics
Tables
Set out a price list or a timetable as a real table of rows and columns, reading right to left or left to right.
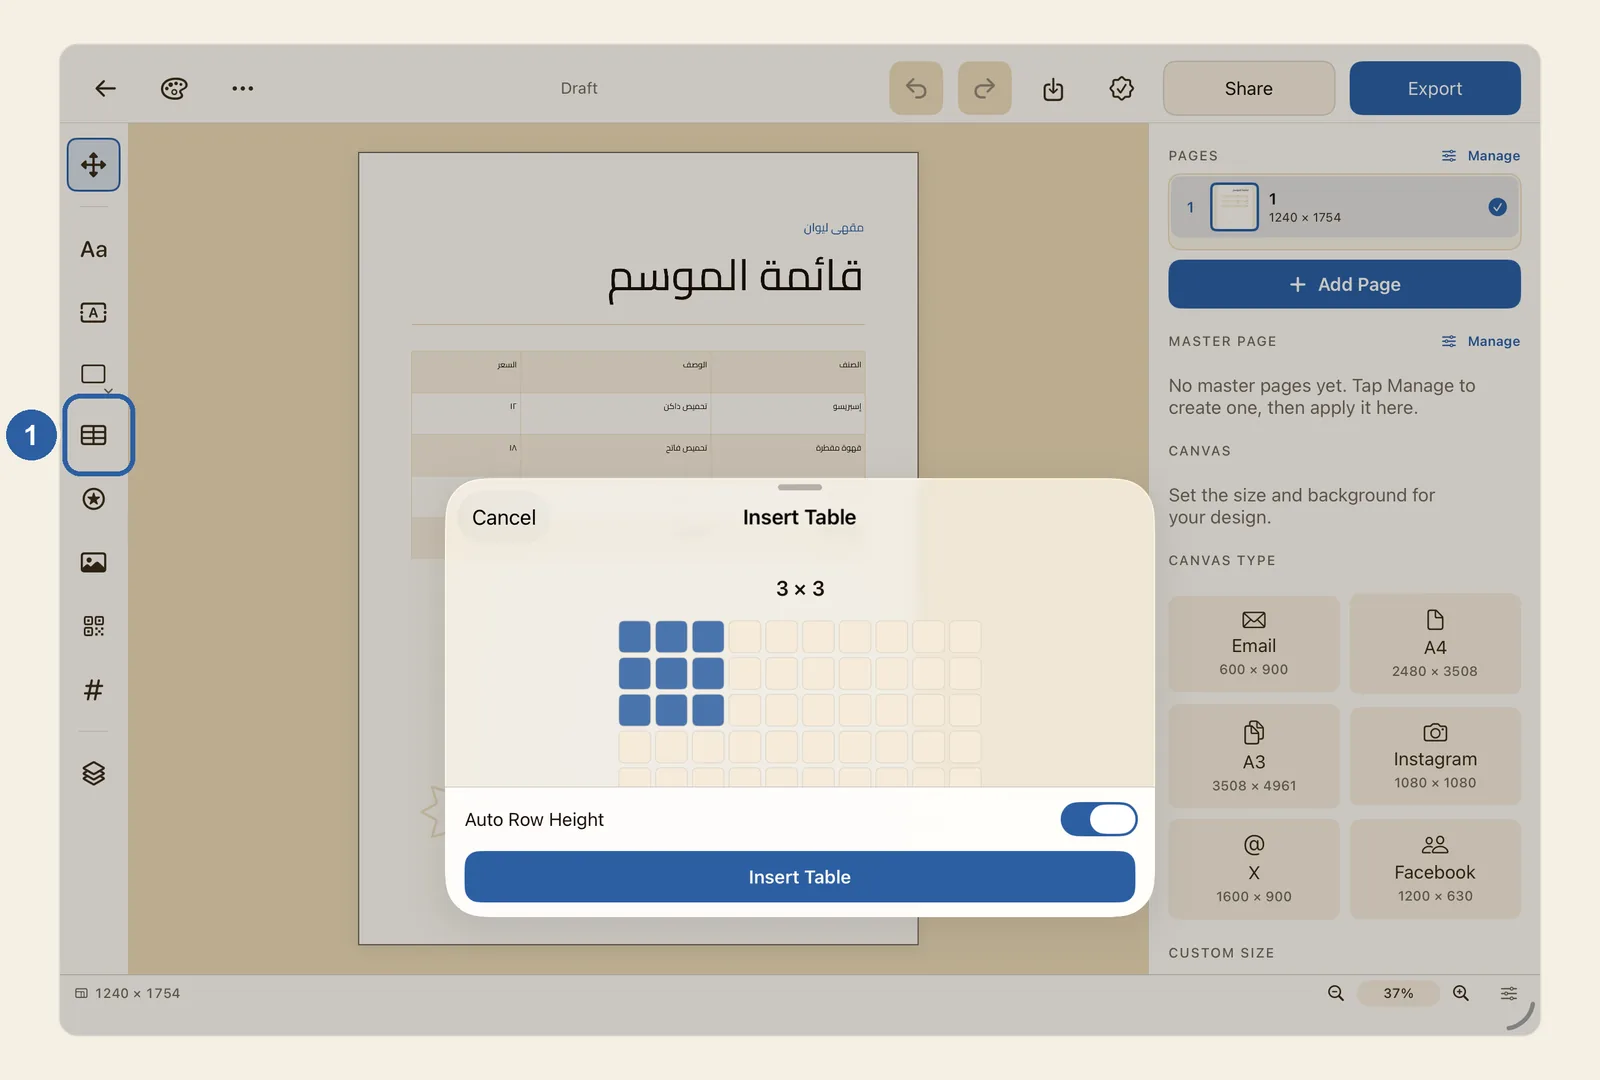
A table keeps item names and prices lined up in rows and columns, so you don't have to line up separate text boxes by hand. Each cell holds its own text, in Arabic or in English.
How to add a table
Tap Table on the tool rail, the column of buttons along the left edge of the editor. When Liwan Studio is in Arabic, the rail is on the right edge. Table is the button with a small grid, just below the shape button. In the picture at the top of this page, it is marked 1.
The Insert Table window opens over the page, as in the picture at the top of this page.
Drag across the grid, or tap a square, to choose how many rows and columns you want, up to 10 of each. The coloured squares show your choice, and the size above the grid reads rows × columns. It starts at 3 × 3.
Leave Auto Row Height on, so that each row grows to fit its text as you type. Then tap Insert Table. The table appears in the middle of the part of the page you are looking at. To add nothing, tap Cancel.
The new table is already selected, with handles around it. Drag it to move it. To come back to a table later, tap it once on the page to select it.
To type in a cell, double-tap it. With a keyboard, press ⇥ (Tab) to go to the next cell, and ⇧⇥ to go back to the previous one.
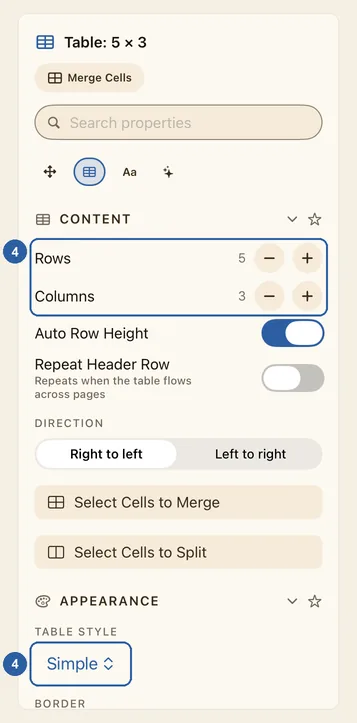
The table's settings are in the properties panel, on the other side of the page from the tool rail. Its title shows the table's size, such as Table: 5 × 3. The first time, the panel opens on the Item tab. Tap Table, the second tab, with the small grid. When the panel is narrow, the tabs show only their icons, as in the picture. With a keyboard, you can press B instead, as long as you are not typing.
Under Content, find Rows and Columns, marked 4 in the picture. Tap + next to Rows to add a row at the bottom, or + next to Columns to add a column after the last one. Tap − to remove the last row or column. A table can have up to 50 of each.
A new table reads right to left: its first column is on the right, so a new column is added on the left. To turn it around, choose Left to right under Direction. This changes only the order of the columns; the text in each cell keeps its own direction.
To change the table's look, scroll down to Appearance and tap the menu under Table style, also marked 4. Choose Simple, Grid, Modern, Minimal, Textbook, Government Form, Catalog or Report. Each style sets the lines, the colours and the space inside the cells together, and makes the first row a header row with bold text.
Tips
- Start small. You can always add rows and columns later from the Table tab.
- Rows and Columns only add or remove at the end. To add a row or column in the middle, press and hold a cell, then lift your finger, and open Table in the menu that appears: Insert Row Above, Insert Row Below, Insert Column Before, Insert Column After, Delete Row and Delete Column work on the cell you pressed. While you are typing in a cell, the same actions are also buttons in the Table tab, under Insert / Delete.
- To join cells, for example for a heading across the whole top row of a menu, tap Merge Cells at the top of the panel, or Select Cells to Merge. A bar reads "Drag to select cells, then tap Merge or Split". Drag across the cells on the table, then tap Merge, and the bar closes. To leave without merging, tap Done. The joined cell keeps only the text of the first cell; the text in the others is removed.
- To divide a cell, tap Select Cells to Split, tap the cell, then open Split in the same bar. Split Horizontally cuts it into a top and a bottom half, and Split Vertically into two side by side. When you tap a merged cell, Unmerge Cells appears there too.
- While you type in a cell, the Table tab also shows a Cell section for that cell: Cell Alignment, Row Type (Header, Body or Footer), Cell Background and Numerals. Kashida under Cell Alignment justifies Arabic text by stretching the joins between letters — see Kashida justification. For prices in Arabic-Indic or Western digits, see Numerals.
- To change the font, size or colour of the text in a cell, use the text style bar along the bottom of the editor while you type in it.
- Under Appearance, Border sets the colour and the width of the lines, from 0 to 12 pt. Colors sets Table fill, Header, Footer and Alternate rows, which colours every other Body row; Clear next to a colour removes it. Cell Padding sets the space inside every cell. The Header and Footer colours fill the rows whose Row Type is Header or Footer.
- Choose a Table style first, then adjust the colours. Once you change one, the style reads Custom. Choosing a style again replaces your changes.
- Dragging the table's handles stretches all its rows and columns in proportion. While Auto Row Height is on, each row goes back to fitting its text, so turn it off in the Table tab if you want to set the height yourself.
- Repeat Header Row makes no change you can see: a table always stays whole, on one page.
- You can also open the Insert Table window from the … menu in the top bar: tap Insert table….