
Canvas and layout
Alignment guides
Objects snap into line with the page centre, the page edges and each other as you drag, so menus and cards line up without measuring.
While you drag an object, Liwan Studio looks for lines it could sit on. When the object comes close to one, it snaps: it jumps the last few points into place, and a thin blue line shows what it lined up with.
How to line objects up with the guides
Drag an object on the page, such as a logo, a shape or a price. If another object is selected, tap the one you want first.
To drag a text box without starting to type in it, tap an empty part of the page first, then drag the box. See Select and move objects.
Move the object slowly towards where you want it. A thin blue line appears when one of its edges, or its centre, lines up with:
- the centre of the page
- an edge of the page
- a margin 40 points in from each edge of the page
- an edge or the centre of another object
At that moment the object jumps into line. Small dots on the line mark the other objects it lines up with. You can get two lines at once, one across and one down, as in the picture below.
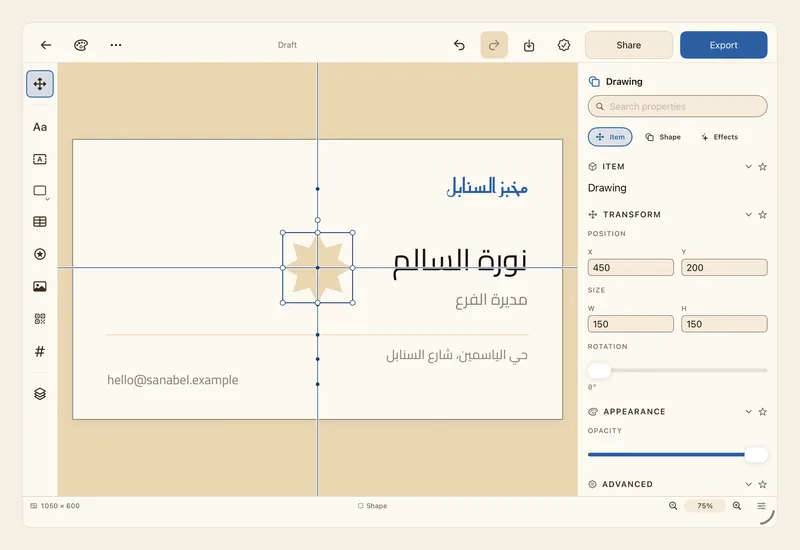
Let go while the line is showing. The object stays exactly in line, and the line disappears.
Guides appear only while you drag. They are not part of your design and never appear in what you export.
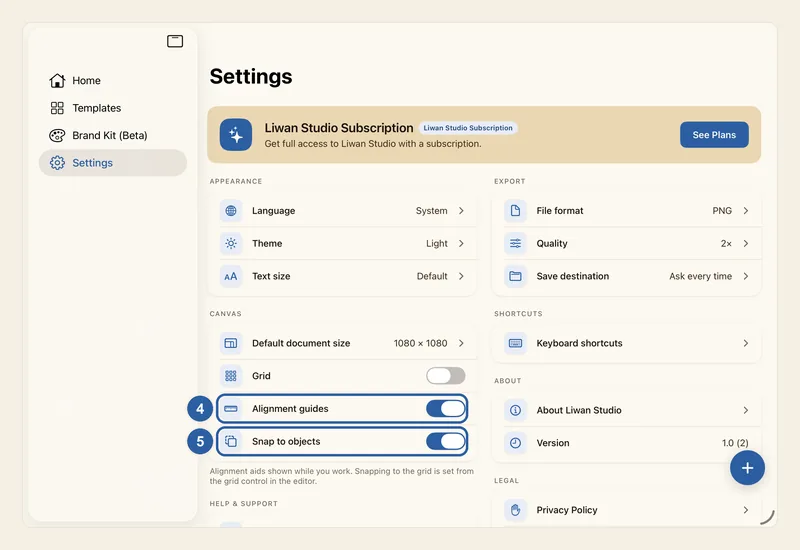
To work without them, tap Back, the arrow at the start of the editor's top bar, then tap Settings. Under Canvas, two of the switches control this, and both are on at first:
- Alignment guides, marked 4, shows or hides the blue lines. With it off, objects still snap; you just don't see the line.
- Snap to objects, marked 5, lines objects up with each other. With it off, objects no longer snap to other objects, but they still snap to the page centre, the page edges and the 40-point margin.
Each change takes effect at once, in every design on this device.
Tips
- Snapping works only while you drag one object. Objects you drag together never snap. See Work with several objects at once.
- When the object is close to the page centre and to another object at the same time, it lines up with the page centre. The page's own centre, margin and edges always come before other objects, and other objects come before the grid.
- Drag slowly near a line and the object is pulled onto it from a little further away. Drag quickly and the pull is weaker, so the object slides past more easily.
- A rotated object snaps by its centre only, not by its edges.
- Hidden objects are ignored: the object you drag does not snap to them.
- The 40-point margin is fixed. It does not follow the Safe margin you set under Print & bleed, and nothing is drawn there until an object snaps to it. It uses the same units as the page size shown in the status bar, so on a large print page it is a narrow strip. See Print & bleed.
- Snap to objects is also in the menu of the Grid button in the status bar, once you have added that button. It is the same setting as the one in Settings. If you turn on Snap to Grid in that menu, objects snap to the grid lines too, but the page and other objects come first. See Grid.
- The two switches affect moving only. Rotating an object still catches at every 15°, and resizing still catches the width or height of another object. See Resize and rotate objects.