
Pictures and graphics
Remove Background
Cut a product or dish out of its photo right on your iPad or Mac, and switch back to the original photo whenever you like.
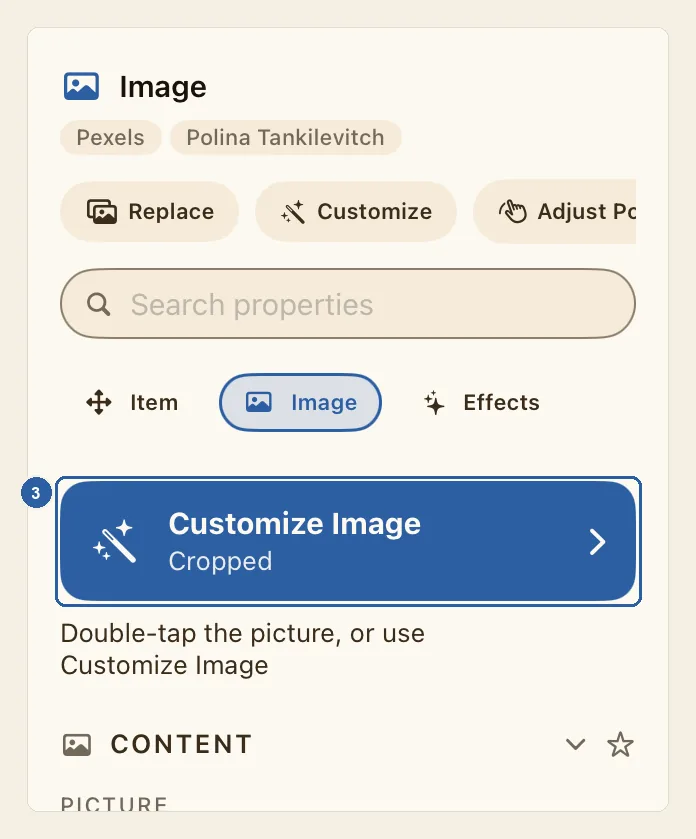
Removing the background keeps the subject of a photo, such as a dish, a product or a person, and makes everything around it see-through, so the page shows behind it. Liwan Studio does this on your iPad or Mac, without sending the photo anywhere, and always keeps your original photo.
How to remove a photo's background
Tap the photo on the page to select it. Handles appear around it. If other objects cover it, pick it in Layers.
In the properties panel beside the page, tap Image, the tab with the photo icon at the top of the panel. A selected photo often shows the Item tab first. With a keyboard, you can press I instead.
Tap the blue Customize Image card at the top of the Image tab, marked 3 in the picture at the top of this page. The Customize Image page opens, with your photo in the middle.
To skip the first two steps, double-tap the photo on the page: it opens the same page. See Customize Image.
In the dock along the bottom of the page, tap Background, the icon of a person in a frame. The Background card opens beside the photo, or under it in a narrow window.
Tap Remove Background, the blue button at the top of the card.
While Liwan Studio works, "Removing background…" shows in place of the button, with Cancel. Then the background disappears. The subject stays exactly where it was, at the same size, and the page will show through around it.
Where the button was, two choices now appear: Removed and Original. Tap Original to see the whole photo again, and Removed to go back to the cut-out. The original photo is never changed, so you can switch as often as you like.
When you are happy with the result, tap Apply at the end of the top bar. The page closes and the photo in your design shows the cut-out. Until you apply, your design doesn't change.
Tips
- It works best when the subject stands out clearly from what is behind it: a dish on a plain table, a bottle against a bare wall. If Liwan Studio can't find a clear subject, the card says "We couldn’t find a clear subject to keep. Try an image with a distinct foreground.", with Retry. Try another photo, or cut it out by hand with Refine Mask or Selection Tools.
- When the photo holds two or more subjects, such as two cups side by side, all of them are kept and their outlines appear on the photo. Tap an outline to keep that subject alone. Under Select Subject (Select People when they are all people), Keep All keeps them all again, and a button for each, such as Subject 1, keeps one.
- Under Quality, below Removed and Original, choose Fast, Balanced or Precise. Every removal starts on Balanced; Precise is the best for hair and fine detail. Choosing another Quality makes the cut-out again, so choose it before you fix the edges by hand.
- To fix the edges by hand, open Refine Mask in the card. The mask is what decides which parts of the photo show and which are see-through. Choose Restore and paint over the photo with your finger, Apple Pencil or the mouse to bring back parts of the subject that were cut off, or choose Erase to paint away leftover background. Brush Size sets the size of the brush, Reset Mask goes back to the cut-out as Liwan Studio made it, and Done Painting puts the brush down. Erase also works on a photo whose background is still there, so you can clean up a photo with no clear subject by hand.
- Refine Edge works on the edge of the cut-out: Shift Edge grows or shrinks it, Feather softens it and Smooth evens out a ragged one.
- Selection Tools select part of the photo: Magic Wand selects the colour you tap, with Tolerance to say how alike the colours must be, and Lasso, Rectangle and Ellipse select what you drag around. Then tap Keep to keep only the selection, or Erase to erase it.
- Cut-out Style draws round the subject itself: Outline gives it a sticker-style ring, Glow a soft light, and Shadow a soft shadow falling down and to the right. They follow the subject's real edges.
- Restore Original, at the end of the card, removes the cut-out and everything made from it, as one step, and the Remove Background button comes back. The Reset at the top of the card does the same. Every step can be undone with the arrows in the top bar of the page.
- For a blurred background that keeps the whole photo, like a portrait lens, use Background Blur in the Effects category instead.
- To remove the background from several photos at once, hold ⇧ (Shift) and tap each one on the page, or press ⌘A to select everything on the page. Under the count, a button such as "Remove Background (3 images)" appears; it counts only the photos that still have their background. They are all done on Balanced, and one Undo takes them all back. A photo with no clear subject is left as it was. See Work with several objects at once.
- Background removal isn't offered for a logo imported as SVG, which has no photo background to find, or for a picture inside a shape.
- Replace Image, at the top of the Image tab, puts in a new photo without the cut-out. Open Customize Image again to remove the new photo's background.
- A drop shadow follows the outline of the subject alone, as long as it has no backdrop. A border still goes around the whole picture box.
- For a picture of the product alone with a see-through background, for an online shop for example, put it on a page by itself, leave its backdrop empty, and export a PNG or WebP with Transparent background turned on. See Export.