
Canvas and layout
Add a border
Put a border of any colour, thickness and style around a photo, a text box, a shape or a table.
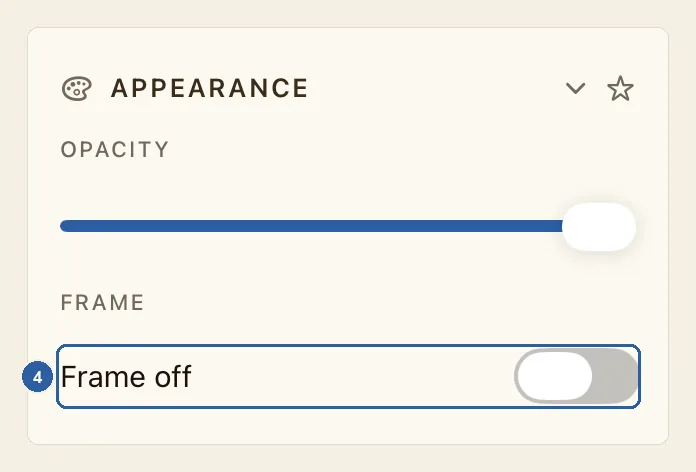
In Liwan Studio a border is called a Frame. It runs along the edge of an object, which makes it useful for setting off a product photo, boxing in a price or an offer, or outlining a table on a menu.
How to add a border
Tap the object you want to put a border around: a photo, a text box, a shape or a table. Its settings appear in the properties panel beside the page.
When you tap text, the cursor goes into it. That is fine: the border goes around the whole text box.
Make sure the panel shows the Item tab, the first tab in the row near the top of the panel. Selecting a photo, shape or table usually opens it; selecting text opens the Text tab instead. To switch, tap Item, or tap Item (Box), the four-arrows button at the top of the tool rail. With a keyboard, press V, as long as you are not typing in a text box.
If the Item tab is already showing, don't tap Item (Box) again: that switches back to the object's own settings.
Scroll down to Appearance, the section after Transform. Frame sits just below the Opacity slider. If the section is folded away, tap the Appearance heading to open it.
If there is no Frame, the object you selected can't have a border. The tips below list the objects that can.
Turn on the switch under Frame, marked 4 in the picture at the top of this page. Its label changes from Frame off to Frame on, and a thin dark border, 2 pt wide, appears just inside the edge of the object. On a shape that already has an outline, the border starts in the outline's colour.
The border's settings open under the switch.
To change the colour, tap the round swatch next to Color. It shows the border's current colour. Choose a new colour in the picker that opens.
Finish the border with the controls under Color:
- Width: drag the slider to make the border thinner or thicker, from 0 to 40 pt. The number under the slider shows the width. At 0 pt the border disappears, although the switch stays on.
- Alignment: choose where the border sits on the object's edge. Inside, where it starts, keeps all of it within the object. Outside moves it out past the edge, and Center spreads it across the edge. The object's position and size stay the same with all three.
- Opacity: drag this slider, the one under Alignment, to make the border fainter. Its label shows the strength, 100% at first. It fades only the border, not the object.
- Style: tap the menu, which shows Solid at first, and choose Solid, Double, Triple, Dotted or Dashed.
To remove the border, turn the switch off again.
Tips
- Frame is offered for photos and QR codes, text boxes, tables, and shapes with a closed outline, such as rectangles, circles, stars and polygons. It is not offered for lines, freehand drawings whose ends don't meet, or stickers. To outline a sticker, use Stroke in its Sticker tab — see Stickers.
- The border follows the object's own outline: the rounded corners of a photo, the curve of a circle, the points of a star.
- On a photo whose background you removed, the border still goes around the whole picture box, not around the person or product. See Remove Background.
- A shape can have both an outline and a border. Its Stroke, in the Shape tab, is the outline; Frame is a separate border with its own colour, width and style. See Shapes.
- On a table, the border goes around the whole table. The lines between the cells are set separately, in the Table tab. See Tables.
- On a text box, the border is drawn over the text. With Inside, a thick border can cover letters that sit close to the edge of the box. Choose Outside, or make the box a little bigger.
- Double and Triple share the width between two or three thin lines, and their inner line stays inside the object even with Outside. Give them a larger Width than a solid border, so the lines stand apart.
- Appearance has two opacity sliders. The Opacity slider at the top fades the whole object, border included; the one inside the border's settings fades only the border. The colour picker for the border has no opacity of its own, so use that second slider.
- If text in another box flows around this object, it keeps clear of the whole border, including the part that sits beyond the edge with Center or Outside. See Text Wrap.
- With several objects selected, Frame is not offered. Add the border to each object in turn.
- Turning the switch off forgets the border's settings. When you turn it on again, it starts over as a thin dark line. To get your own settings back, use Undo straight away. Each change is one undo step, and a whole slider drag counts as one — see Undo and redo.
- From another tab, type "frame" or "border" in Search properties, above the tabs, then tap Frame in the results. The panel switches to the Item tab.
- The border is part of the object, so it appears in PNG, JPEG, PDF and MP4 exports just as it looks on the page. See Export.
- In Split View or a narrow window on iPad, the properties panel is hidden to leave room for the page. Tap Item (Box) at the top of the tool rail to open it.