
Pages and print
Print & bleed
Record the bleed your print shop asks for and how far to keep important content from the cut, so Preflight can warn you before you print.
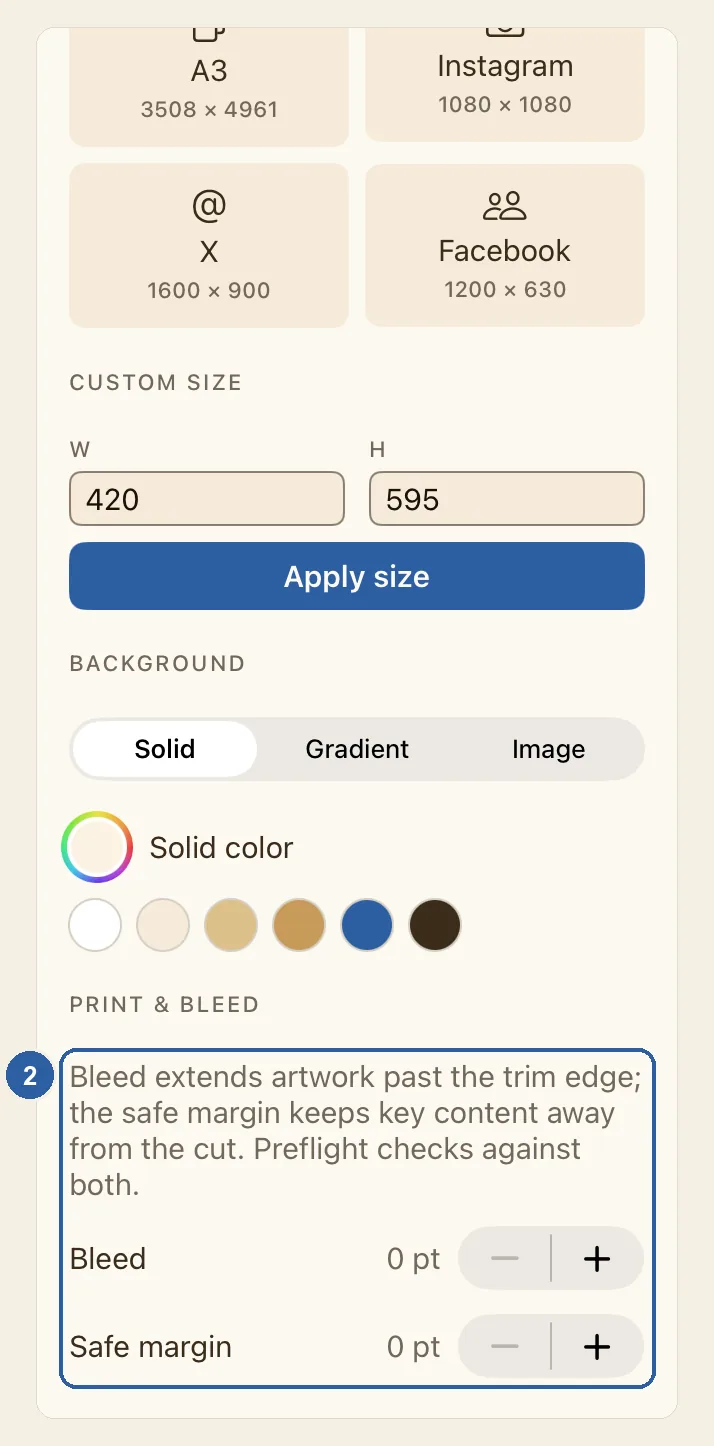
A print shop trims printed sheets to size, and the cut can land slightly off the line. Bleed is how far a photo or colour band should run past the edge of the page, so a small slip leaves no white line. The safe margin is a strip just inside the edge where you put nothing important, such as prices, phone numbers or a logo, so the cut can't touch it.
In Liwan Studio these two numbers are used only for checking. They draw nothing on the page and add nothing to the exported file. Preflight uses them to tell you which objects are in the wrong place.
How to set the bleed and safe margin
Go to the page you want to set, then tap an empty part of it so that nothing is selected. The properties panel beside the page now shows the settings of the page itself.
If you don't see the properties panel, for example when Liwan Studio shares the iPad screen with another app, tap Item (Box), the four-arrows button at the top of the tool rail, to open it.
Scroll the panel down, past Canvas and Background, to Print & bleed. It is the last section of the panel. Under a short note you find Bleed and Safe margin, each with its current value and a − and + button. In a new design both are 0 pt.
Tap + next to Bleed until it shows the bleed your print shop asks for. Each tap adds 3, up to 72; tap − to go back down. Then do the same for Safe margin. Each value applies to all four edges of the page.
Now tap the Preflight button in the top bar, the seal with a check mark beside Share and Export, to see which objects cross the lines you set.
Tips
- The numbers use the same units as the page's width and height, the W and H under Custom size, so the right value depends on the page. If your print shop asks for 3 mm of bleed, set about 9 on a 420 × 595 page, which is A5, and about 36 on a 2480 × 3508 page, which is the size of A4 under Canvas type and in New design.
- Each page has its own Bleed and Safe margin. In a menu or booklet, check every page: Duplicate copies the values with the page, but a page made with Add Page starts at 0. See Pages.
- Nothing appears on the page when you change these numbers, and the exported PDF is still exactly the page size, with no extra bleed area and no crop marks. If your print shop needs the bleed inside the file, ask them what size to make the page.
- With a bleed set, Preflight lists an object that runs past the page edge but stays inside the bleed under Info: "An object extends into the bleed area (it will be trimmed to the page edge)." That is the right place for a photo or colour band that should reach the edge. An object that goes further is listed under Warnings: "An object extends past the bleed area and may be trimmed off."
- With a safe margin set, Preflight lists every object that crosses it under Info: "An object extends beyond the safe margin." A photo that fills the whole page is listed too, and that is fine. Move text, prices, phone numbers and logos inside.
- To stop a check, set its value back to 0.
- These checks are only in the Preflight panel that you open from the top bar. The short Preflight list that can appear in the Export sheet covers fonts, pictures, stickers and storage only.
- While you edit a master page, the panel doesn't show Print & bleed. The bleed and safe margin checks don't cover the objects on master pages either, such as a logo repeated on every page, so keep those inside the safe margin yourself. See Master Pages.
- Objects you drag still snap at a fixed distance from the page edge. That distance doesn't change when you set Safe margin. See Alignment guides.