
Canvas and layout
Order, lock and hide objects
Put text in front of a photo, keep a finished background from moving, or hide an object while you work.
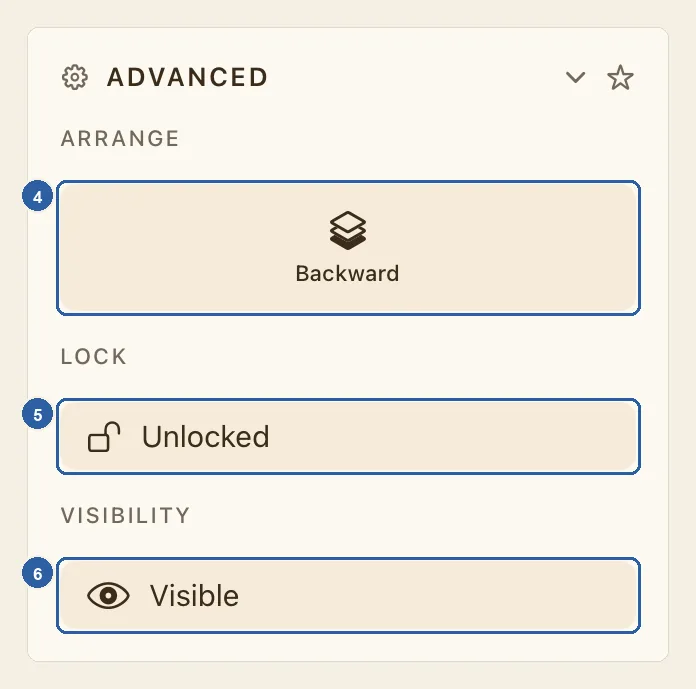
The objects on a page sit in a stack, one on top of another. Each new object goes on top, so a photo you add after your heading covers the heading where they overlap. The Advanced section of the Item panel moves an object up or down that stack, locks it so it can't be moved by accident, and hides it.
How to order, lock and hide an object
Tap the object on the page to select it. If it is buried under other objects, tap Layers, the stacked-layers button at the end of the tool rail, tap the object's row in the list, then tap Done.
Make sure the panel beside the page shows the Item tab. Selecting a picture, shape or sticker usually opens it; selecting text opens the Text tab instead. To switch, tap Item (Box), the four-arrows button at the top of the tool rail, or tap Item at the top of the panel. With a keyboard, press V.
If the Item tab is already showing, don't tap Item (Box) again: that switches back to the object's own settings.
Scroll down the panel to Advanced, its last section, below Transform and Appearance. If the section is folded away, tap the Advanced heading to open it.
Under Arrange, marked 4 in the picture at the top of this page, tap Forward to move the object one step towards the front, or Backward to move it one step towards the back. Each tap swaps it with the object next to it in the stack, so tap again to keep going.
Only the moves that are possible are shown. The object in the picture is already at the front, so only Backward appears; an object at the very back shows only Forward. When the page holds a single object, Arrange does not appear at all.
To lock the object, tap the button under Lock, marked 5. It changes from Unlocked to Locked, and its open padlock closes. The object now stays put: tapping or dragging it on the page no longer picks it up.
To hide the object, tap the button under Visibility, just below, marked 6. It changes from Visible to Hidden, and the object disappears from the page. Tap the same button again to switch back.
Tips
- To move an object several steps at once, open Layers and drag its row up or down. The top of the list is the front of the page. See Layers.
- There is no command that sends an object straight to the front or the back. Forward and Backward always move it one step.
- The same two moves are in the object menu as Bring Forward and Send Backward. On iPad, tap the object with two fingers, or press and hold a picture, sticker, table or a shape with no text in it, then lift your finger. On a Mac, right-click the object, or use the Arrange menu in the menu bar.
- Moving forward and backward works on one object at a time: with several objects selected, the Arrange menu and the keyboard shortcuts leave them where they are. Opening the object menu on one of them selects just that object.
- Taps go through a locked or hidden object to whatever lies behind it. Lock a background picture, and you can tap the text on top of it without moving the picture by mistake.
- A locked object is also left out when you press ⌘A to select everything, and the arrow keys on a Mac don't move it. Locking only guards against accidents on the page: if you select a locked object from Layers, you can still change it in the panel.
- A hidden object is not drawn on the page and is left out when you export a PNG, JPEG, PDF or MP4. Text that was flowing around it moves back into the space it left — see Text Wrap.
- With several objects selected, the panel shows a Visible switch that hides or shows all of them together. Locking is done one object at a time. See Work with several objects at once.
- In a narrow window on iPad, tapping Item (Box) opens the panel from the bottom of the screen.
- You can undo each of these changes. See Undo and redo.
Keyboard shortcuts
- ⌘] Bring Forward
- ⌘[ Send Backward